How to oil a Grandfather Clock
How to properly oil a clock
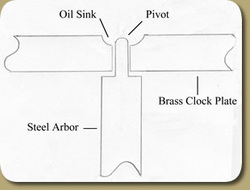
The first step in oiling or servicing your Grandfather clock is to make sure you use gloves at every stage. I personally use cotton gloves when handling any wood parts of the clock and I use latex gloves when handling any brass or metal parts. There is acid in the oils of our fingers and this acid eats through the thin layer of lacquer when it comes in contact with brass. If for some reason you have to handle any brass you can always clean the brass after you have touched it with a soft cloth and any type of glass cleaner. I always set up a table prior to working on a clock to save my back. You will see as you progress that there will be a lot of bending over and setting clock parts on the floor without a table. After the table is set up, I always cover it with a soft cotton towel to prevent any brass from being scratched. I also use a small container like a small Tupperware container. This is to put small parts in that you will be removing from the clock. By putting these small parts in, you will lesson your chances of misplacing them. Once the table is set up and the towel is in place and your container is on the table, you are ready to begin. Here we go. I suggest you read through the entire instructions that I have set out here prior to just diving in. Remove the nut that holds the hands in place by gently holding the minute hand and turning the nut counter clockwise. This nut should be somewhat tight and most likely will need to be removed by using a small pair of pliers. Be careful here and go slowly. If the pliers slip, they could scratch the hands or nut, or worst you could slip and scratch the face of the clock. Once the nut is removed, place it into the small container for safe keeping. Gently remove the minute hand. Sometimes it will stick and a gentle rocking back and forth will loosen the hand and it will come off. ****A side note here. I always set the clock I’m working on to 12:00 before I remove the hands. That way when I reassemble everything, the hands will go back at 12:00 and the chiming sequence will remain the same. If you don’t mark the hand position on the shaft before you remove the hands, then you will have to figure out the proper position of the minute hand. There are 4 ways the hand will go on the shaft; however, only 1 is the correct way.**** Next, you will need to remove the hour hand by gently pulling on the base of the hand and again gently rocking it back and forth until it comes off. Set this hand in the small container. Next, we need to remove the wooden face plate on the clock. There are 2 screws that hold the clock movement to the seat board of the clock. You need to remove theses screws. Most of the time theses screws are in tight, so you will need to loosen them with a screwdriver. Once you get them loose, they have a large head on them and can be removed with your fingers. I won’t keep repeating myself after this, but you guessed it; put the screws in the small box and any other items you are taking off. Now you will need to gently slide the movement toward the back of the clock as far as you can without having the whole movement fall. I have never seen a clock case that has a large enough gap in it for this to happen but you never know. The bottom of the face will limit the amount you can move the movement. You do need to take caution here and be careful not to bend the hammers too much or get them caught in the chime rods. You don’t need to move the movement far, just enough for the wooden face plate to slide down and clear the post that holds the hands. Once you have moved the movement toward the back of the case, you will need to remove the front wooden cover plate from the clock case. The cover plate is usually held on by 2 to 4 screws. With the cover plate removed, you can now remove the entire movement from the clock. Gently grab the sides of the movement or face and maneuver the movement out onto your work table. On the four corners of the clock movement on the front plate, you will see a clip that will either slide to one side or is removable. These clips will hold the face to the movement. Carefully slide or remove the clips and carefully separate the movement from the face. Set the face down and out of the way and in a safe place for now. On the back side of the movement you will need to remove the pendulum leader and the suspension spring. By removing the nut (or sometimes just a pin) on the shaft, this will remove the suspension spring and then you can remove the pendulum leader. Be very careful with the suspension spring because it is very thin and they will break easily. With the movement on your work table, it is now time to inspect and clean the clocks movement. Start cleaning the back of the movement with a soft nylon brush, loosening any dirty dried out oil in the oil sink holes or pivot hole. Look for any black dirty oil or you may find that the oil has broken down and dried out and turned green. After you have cleaned the loose particles, you will need to dip the nylon brush in the cleaning solution and rub the pivot holes in a circular motion to remove as much embedded dirty oil as you can. Using a loop, or some type of magnification, look into each pivot to make sure that you have removed as much old oil as you can. Sometimes this takes several passes to get a good cleaning. Also, look for any wear on the pivots or on the brass itself. If the brass bushing is worn and you don’t have a perfect fit with the bushing and pivot, the movement will need to be either rebuilt or replaced. A clock movement with a worn bushing will never run properly. After you have cleaned both the front and back side of the movement, wipe off the movement with a clean cotton cloth to remove any excess dirt. Be careful when wiping down the movement with the cloth and do not pass the cloth back over the pivot. You may lodge some loose dirt into the pivot. Now that the movement is cleaned, it is time to re-oil the movement. Re-oiling the movement might sound like a simple task and it mostly is. There are a few things you need to do and a few precautions that need to take place. When oiling a clock movement, it is better to have less oil than more oil in the pivot holes. If you use to much oil in the pivot holes and the oil starts to drip down the face or back of the movement, then the remaining oil in the pivot will follow the drippings due to gravity and in a short period of time all your oil will be dried up inside the pivot holes and you are right back where you started from. Too little oil and again the oil won’t last long and you will be doing this again in a few months, or even worse, your movement will wear out due to lack of oil. So be careful when oiling the clock. Now what kind of oil to use? “NEVER AND I MEAN NEVER USE WD-40” on the clock movement. I know clock repair shops that will hand you the clock back and refuse to work on them if they even smell WD-40. I personally have to charge twice as much to clean a movement that has been sprayed with WD-40 or any other type of spray oil. We have to run it through our ultrasonic cleaner several times with fresh cleaning solution each time and the solution is not cheap. DO NOT use sewing machine oil or 3 in 1 oil. There are several companies on the internet that will sell you high quality oil and some even sell an oiling kit. Pour a small amount of clock oil in a small container about the size of a bottle cap. Dip a small nail in the oil and then just slightly touch each pivot hole with the end of the nail. There will be enough oil on the end of the nail head to oil the pivot holes. Dipping the nail in the cap each time, then the pivot holes. If you use a loop or magnifier, you will see that you are getting just a small amount on each pivot. Again, if you put in too much and it starts running, simply wipe the oil off the movement and re-oil the pivot hole again. After you have re-oiled the movement, it is now time to reassemble the clock movement in the reverse order you took it out. Once you have the movement back and the entire clock reassembled, you need to make sure the hammers are hitting the chime rods properly to give you a crisp clear sound. Re-install the hands, making sure they clear each other, and that the hour hand is not dragging on the face. Once you have re-installed the movement and checked the hands, re-install the weights and pendulum. Start the pendulum to swing and adjust the time. |

|